Monday, May 2, 2016

The Witcher 3 - Hover Horse


Decided to post a video about one of the greatest games and greatest gaming glitches ever made in the Witcher 3 Wild Hunt.

Also, I'm back!

For now.

Thursday, January 22, 2015

Main.as or Document Class (AS3) Part 2

As promised we're going to go over keyboard inputs now.

The point behind the Document Class (DC) is to basically control everything that goes on in your game/program/whatever.  Unless you have a mouse-only game you will always need the keyboard.  As the keyboard is static in the sense that it's always the same you can go ahead and use the same setup for every program.  The work is long and boring initially, but you only have to do it once, so it's worth it.

1.  Set up your variables.

public var kLeft:Boolean;//37
public var kRight:Boolean;//39
public var kUp:Boolean;//38
public var kDown:Boolean;//40

I'm only doing these for as an example.  You can add all the keys if you wish.  We set these Booleans up because we only care if a key is pressed down or not.  We don't care what the functionality is.  That can be handled in the other Classes, not our Main.as.

2.  Call the keyboardEvent listeners.

 stage.addEventListener(KeyboardEvent.KEY_DOWN, keysDown, false, 0, true);
 stage.addEventListener(KeyboardEvent.KEY_UP, keysUp, false, 0, true);

This calls to see if a key is pressed down or is released up.  Make sure you add that "stage." beforehand as it won't work otherwise.

3.  Handle key presses.

 public function keysDown(ke:KeyboardEvent) : void
 {
  if(ke.keyCode == 37)
  {
   kLeft = true;
  }
 
  if(ke.keyCode == 39)
  {
   kRight = true;
  }
  
  if(ke.keyCode == 38)
  {
   kUp = true;
  }
  
  if(ke.keyCode == 40)
  {
   kDown = true;
  }
 }
 
 public function keysUp(ke:KeyboardEvent) : void
 {
  if(ke.keyCode == 37)
  {
   kLeft = false;
  }
  
  if(ke.keyCode == 39)
  {
   kRight = false;
  }
  
  if(ke.keyCode == 38)
  {
   kUp = false;
  }
  
  if(ke.keyCode == 40)
  {
   kDown = false;
  }
 }

What is this sorcery?!  Well it's quite simple, actually.  From the previous step we call constantly to see if a key is pressed or released.  When it's pressed we check the keyboard input (ke) and check it against whichever key want want to process (keycode == "n").  Don't know the keycode number?  No problem.  You can check the Interwebs with a Google search or just go here:  http://www.dakmm.com/?p=272.  Don't worry, I'm not affiliated with them.  I just have that bookmarked.  You can also do the arduous task of finding the keycodes yourself by simply tracing out the keycode in the keysDown to look something like this:

 public function keysDown(ke:KeyboardEvent) : void
 {
  trace(ke.keyCode);
 }

Now, when you run the program you can just press a key and it should trace out what keycode it corresponds to.

So in the keysDown function we set the corresponding Boolean to true, so if we press the down arrow then kDown is true.  And in the keysUp function we do the reverse, so if we release the down arrow, kDown is false.

Now because we already setup the whole Main.instance thingy from the last part we can access the key presses from anywhere.

3.  As an example, let's say we created a Hero.as Class which of course allows us to use a Hero.  We could create an update function that constantly checks to see which keys are being pressed.  Here's the whole sheband:

package  
{
/*
 An Amazing Coding Product of Benjamin Floyd
 
 If you got this, even by trickery, feel free to use it.
 
 A tip-o-the-hat would be nice though.
*/

import flash.events.Event;
import flash.display.MovieClip;

public class Hero extends MovieClip
{
 public function Hero() 
 {
  addEventListener(Event.ADDED_TO_STAGE, init, false, 0, true);
 }

 public function init(e:Event = null) : void
 {
  removeEventListener(Event.ADDED_TO_STAGE, init);

  addEventListener(Event.ENTER_FRAME, update, false, 0, true);
 }
 
 public function update(e:Event = null) : void
 {
  if(Main.instance.kLeft)
  {
   x -= 1;
  }
  else if(Main.instance.kRight)
  {
   x += 1;
  }
  
  if(Main.instance.kUp)
   {
   y -= 1;
  }
  else if(Main.instance.kDown)
  {
   y += 1;
  }
 }
}
}

If you run it as is, then you can move your little Hero all along the place.

And that's it.  All you had to do was see if a key was  pressed and you could add any functionality you wanted to go along with it.

4.  Of course writing out Main.instance every single time you want to access the DC is stupid and annoying so you can simply add a variable to replace all that typing like so:

 public var ROOT:Object;

Now, we need to make sure the ROOT is initialized so in our init function place the following:
   
 ROOT = Main.instance;

Now anywhere you have "Main.instance." just replace it with "ROOT." and you can easily access your DC.

That's pretty awesome, right?

Well, thanks for reading.  I hope you learned something from it.  Join me next time when I talk about some other stuff in regards to programming in ActionScript 3.0!

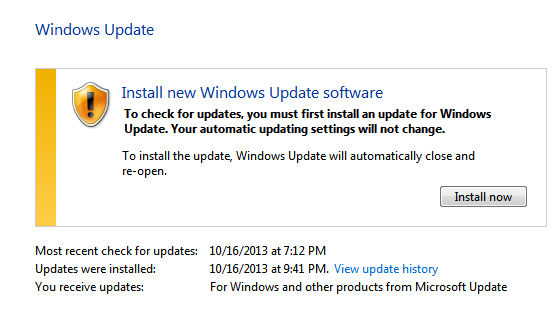
You have to update before you update.  Thanks, Windows.
Here's a screenshot I took last night.  Steam has been crashing my computer when it tries to load so I looked up why.  It said to make sure Windows is up to date.  So I went to update and realized I hadn't updated since the last time I was using this blog, about 1.5 years ago (in case you're wondering I don't update because my computer will almost always crash after an update; I have real good luck that way).  Anyway, I thought this was funny and wanted to share.

Wednesday, January 21, 2015

Main.as or Document Class (AS3) Part 1

Something that I've found to be vitally important in writing ActionScript 3 is accessing the Document Class from other classes and packages.  And the beauty is that once you make your Main.as you will need only a bit of time to adapt it for your other projects.

Keep in mind that my Main.as is constantly changing, mostly because I keep thinking of stuff to add that I know I'll always need.

Here's a bit of code to start us off:

public class Main extends Sprite 
{
 public static var instance:Object;
 public function Main() 
 {
  addEventListener(Event.ADDED_TO_STAGE, init, false, 0, true);
 }
 public function init(e:Event = null) : void
 {
  removeEventListener(Event.ADDED_TO_STAGE, init);
   
  instance = this;
 }
}

So what does this mean and do?

My understanding is that this is called a Simpleton (after re-reading I realized it's Singleton, but I left that in because it's funny). But whether or not that's correct, what this does is allows us access to the Main.as at all times from anywhere in the program.  Of course with what we have written so far, this doesn't mean much, so let's add some important info that would need to be accessed in most, if not all, Classes:


 public const SW:int = 512;
 public const SH:int = 288;
  
 public const SWH:int = SW / 2;
 public const SHH:int = SH / 2;
  
 public var TS:int = 16;
 public var TSH:Number = TS / 2;


In this section we have the stage width (SW) stage height (SH) and half of both of those (SWH/SHH). These are the dimensions of the screen and it makes it a lot easier to access than typing in:

        stage.stageWidth

We also have in there the tile size (TS) and half of the tile size (TSH). Because TS is set to 16 and our stage dimensions are 512 x 288 we have a 16:9 screen ratio to work in.

Do you understand yet why this Main.as is important?  Here's an example:

I have a plumber who has to check collisions with the environment.  In order to do so I need to find out if he's going to collide with a Block or if he's just falling through air.  In order to find out if he's hitting said Block I need to know where the nearest Block is.  Since the map has already been laid out (in this example it has, we'll get to that for real later) we know that all tiles are lined up by the TS that we have established in our Main.as.  So from the plumber's Class we can access Main.instance.TS to find out if the plumber bashes his head on a Block or just goes through air.

If this makes sense to you, you might be wondering why you don't just put in "16" instead of calling out to Main.as.  If it's a simple program, you're right, there's probably not much reason to do this.  But let's say you wanted one level where everything was giant except the plumber.  You could then easily change Main.TS to 64.  You wouldn't have to go back in to the plumber Class or the enemy Class or whatever other class needs to know the tile size to change it all.  You have to type in one number on one Class to change the way the plumber will interact with the level.  That's pretty cool, right?

Well, that's it for now.  I hope you enjoyed this little insight into what I'm learning and doing.  Next time I'll talk some more about the Document Class and how setting up the keyboard controls in Main.as makes life much easier down the road.

Here's a picture to go along with all these boring words:

http://www.gigs4gags.com/funny-programming/

Tuesday, January 20, 2015

Necro Blog

Hmm.  It's been a long time friend of mine.  If we were to go by the numbers according to years it's been 2 years since I last did anything website/blog related.  In actual time it's been 1 year and 4 months.  It's not too late to revive this blog.  As long as I'm alive, it's never too late.

Lately, I've been creating a Tile-Based 2D Engine in Flash, or more accurately with ActionScript 3.0.  I've created multiple variations because I just don't know what to do.  I'm getting better, my code is getting smaller, and I'm learning the value of Object Oriented Programming (OOP).

I started writing a tutorial and only wrote it as I programmed it, because I know most tutorials have so many errors that it never compiles.  But I got too carried away and stopped writing the tutorial and only wrote code.

I started to implement the engine into an actual game, but my focus kept shifting.  Did I want to do a Mario-like platformer or a Zelda-like top-ish down game?  Both, I found.  And the code is similar up to a certain point.  When it got to that certain point I realized that if I knew how to make things OOP then I wouldn't have to write all this code again.  So I went back and refactored the crap out of everything.

So I'm at a crossroads of sorts.  I got my engine up and running for a Zelda-like to the point that I have tile-based collisions with the map and some other Maths based collisions with everything else.  It's incredibly awesome.  I feel incredibly awesome for having written it without the need for a tutorial to look up (I've written it so many damn times I should know it by heart).  But where do I go from here?

I thought about writing a full tutorial of what I've done.  But my goal is not necessarily to be a teacher, but to make games.  So, while writing this blog, I've decided to finish a game.  I don't know when it'll be done.  I don't know if it will be good.  But I know that I will finish it.  It's not a New Year's Resolution or some such as I don't know anyone who has ever kept one.  This is a promise to myself and a promise to my wife who has been very tolerant of my lax attitude about pursing my dream.  This game will be finished by the end of April if not sooner.  I have a plan for it.

The first step is to basically turn this into a devblog.  I'll be sharing what I think is awesome as well as just providing some insights that I've gleaned in my foray into programming.

Peace out and here's hoping to a productive gaming year!


Just because pictures are awesome and I mentioned Mario earlier on, here's a really cool picture.  I don't know the source (and I saved it so long ago I don't remember where I got it) so if anyone knows the creator send me a line so I can give proper credit.

Friday, September 27, 2013

New New Website!


Two posts in one day after a five month dry spell?  Hold me back!

Yes I have just completed my newest new rendition of my website.  It's much more friendly in that it is not a Flash website (except the Flash games, because they're Flash games).

Hop on over and check it out.  And thanks for playing.  www.FLOYDIAN THEORY.com

Welcome Back, Me!


Wow, it's been a long time since I've posted. But I'm a married man now and will probably have even less time to post than normal. But real quick I'm going to talk a little bit about a game I haven't played in a long time. It's called Commander Keen and it is amazing.


I used to play these games all the time when I was back in middle school, maybe even when I was in grade school.  It's hard to remember anything nowadays.

Command Keen is a tile based platformer which luckily allows you to save your progress (remember, I'm married now, so I have very little free time, thus saves make gaming easy).  I'm not sure if I love this game because I'm in a nostalgic high or if this is actually just a fun game.  I think it's fun.  I mean, in how many other games does the hero travel around on a pogo stick?

None.

Well, I'm sure there are more, but that's not the point.  Pogo sticks are cool!

So I just finished beating the first episode.  While playing it I started to remember the game bit by bit.  The wolf creature was always frightening when I was younger because it jumped at seemingly random heights.  So even if you were on a high ledge it could still jump and get you.  This time around, umpteen years older, I saw the beast and immediately ran away, as memories flooded back into my mind.  Then I remembered that young Billy (Commander Keen) has a raygun.  I turned and zapped.  Four times.  Wolf monster no more!

The first episode is short, providing a good couple hours if you try and get everything and are slow on the uptake like yours truly.  It's a great bit of platforming history as well as a solid game in general which holds up in play if not in looks after all these years.  I wouldn't say it's as hard as Super Mario Bros. on the NES but that might just be because there are saves in Commander Keen which makes life a lot easier.

If you like solid platforming then pick it up on Steam.  It's five bucks for the lot and if it goes on sale there's no reason not to pick it up.

Also, this game was made by ID Software.  You know, the guys who made DOOM and Rage and everything.

Monday, May 13, 2013

Fire Particles - An ActionScript 3 Tutorial

Well, hello there neighbor!

Below, you'll see something quite amazing that I happened to stumble across while trying to figure out how to make a starfield for my upcoming SHMUP.

Okay, it's amazing to me.  I'm not even a year old in the programming field, and much less than that in the ActionScript 3 language, so I must say I'm quite impressed with myself for coming up with something like this.

So below is the final product.  I'll be talking you through this, but not in a hand holding way, so if you don't know the basics of AS3 or how to use the FLASH IDE then this is not the proper starting point for you.


Pretty sweet, right? Let's start off with something simple:  the graphics.
DISCLAIMER: I'm using CS5 so if you're using anything else I can't guarantee this will work the same.

I set my stage up to run at 30 FPS and set both the width and height to 480.

Create a 50 pixel yellow ball with a size 10 orange stroke, so it looks something like this.

Turn this into a symbol with F8. "Fire" would be a good symbol name. Give it an instance name of "fire".

Next create a 10 pixel orange square.  Symbolize it calling it "FireParticle" and export it for ActionScript.

All of these will be created dynamically so delete this symbol from the stage, making sure it's still in the Library.

The last graphic is the Bounce button.   Create a 116 px by 38 px orange box.  Symbolize it calling it "ButtonBounce" and give it an instance name of "btnBounce".  Get inside the ButtonBounce symbol and create a Dynamic Text field, giving it an instance name of "txtBounce".  I used the "_sans" font so I don't have to embed it, and sized it to 24 pt.


Cool beans.  Now, let's get into the code.  First, set the Document Class to Main and pop that beautiful baby open.  Save it as "Main.as".  It should already extend MovieClip, but if not go ahead and make it so.
//Main.as
package  
{
 import flash.display.MovieClip;

 public class Main extends MovieClip
 {
  public function Main() 
  {

  }
 }

}

Alrighty. The first thing I like to do is establish the size of my stage for easy reference with a couple of constants.
 
//Main.as
  internal const SWIDTH:Number = 480;
  internal const SHEIGHT:Number = 480;
The most important thing is getting the Fire Particles to show up on screen. Right away in our "Main.as" in our Main() function we'll instantiate 80 of them but we want all of them to be above our fire object.
//Main.as
   //this will instantiate 80 fire particles and that's it.  
   //We'll use the "FireParticle.as" (which we haven't created yet)
   //to get them to reinitialize themselves.
   for (var i:int = 0; i < 80; i++)
   {
    //creates a new FireParticle at the index above our fire so it's always on top.
    addChildAt(new FireParticle(), getChildIndex(fire) + 1);
   }
That's it. If you test now it won't do much because we need to set everything inside the "FireParticle.as".

Go ahead and create that now. Let's add a listener so we know it's been added to the stage. We'll also give it some members (properties), one a reference to our root and the other a variable which will control our particle's speed.
//FireParticle.as
package  
{
 import flash.display.MovieClip;

 public class FireParticle extends MovieClip
 {
  //MEMBERS
  private var ROOT:Object;//our "Main.as" is our root so we need to access it somehow
  
  private var ySpeed:Number;//our particles have to move.  What better way than giving them some speed?
  
  //METHODS
  public function FireParticle() 
  {
   addEventListener(Event.ADDED_TO_STAGE, init, false, 0, true);
  }
  
  private function init(e:Event = null) : void//we set this to "null" so we can use reinitialize it later
  {

  }
 }

}
Now, for prettiness, we know we don't want all of our particles to look exactly alike. That's just boring. So we'll want each individual particle to have a different alpha. This is simple, but it adds a lot of depth to our fire. Let's add a x and a y value so we can see the particles on stage. We'll also go ahead and set a ySpeed and a call to our ENTER_FRAME listener.
 
//FireParticle.as
   ROOT = root;//get our root MovieClip

   alpha = Math.random();

   x = ROOT.fire.x;//sets the x in the center of our fire
   y = ROOT.fire.y;//sets the y in the center or our fire

   ySpeed = 4;//will be used in our ENTER_FRAME listener

   addEventListener(Event.ENTER_FRAME, update, false, 0, true);
Let's go ahead and add our ENTER_FRAME listener, so our particles will move up. As well, if the particle reaches an alpha of "0" we want to reinitialize it, creating an endless cycle without instantiating a new particle.
 
//FireParticle.as
  private function update(e:Event) : void
  {
   y -= ySpeed;//moves this particle toward the top of the screen
   
   alpha -= 0.01;//lowers this particle's alpha every frame
   if (alpha <= 0)//if this particle becomes invisile...
   {
    init();//...we want to reset it
    //this is why we set our "init()" function to a default of "null"
   }
  }
Oops, there's a problem now. Our particles show up but it's all very boring and in a straight line. To change that we'll create a new function, one that is very useful in many areas of gaming. Let's do that now.
 
//FireParticle.as
  private function randomRange(minNum:Number, maxNum:Number) : Number
  {
   return Math.floor((Math.random() * (maxNum - minNum + 1)) + minNum);
  }
Confusing much? I'll try and break it down. What it does over all is take two input numbers (minNum and maxNum) and returns a number within that range. The floor function rounds the number down to a whole number so if we come up with say 5.43 we'd be able to get 5. Let's plug some numbers in for a more practical example, using "3" and "5" for our minNum and maxNum, respectively.
 
//EXAMPLE
  private function randomRange(minNum:Number, maxNum:Number) : Number
  {
   return Math.floor((0.2 * (5 - 3 + 1)) + 3);
  }
If the Math.random() returned "0.2" (Math.random() returns a number from 0 - 1 only) we would then multiply it by "6" which comes out to "1.2".  The Math.floor() function makes our return "1". Make sense? No? Check this link out. That's where I learned it.
Now we can use this function to make our fire that much cooler...well, you know what I mean. We'll change our starting x and y values as well as our ySpeed.
 
//FireParticle.as
   ROOT = root;//get our root MovieClip

   alpha = Math.random();

   x = randomRange(ROOT.fire.x - ROOT.fire.width / 2, ROOT.fire.x + ROOT.fire.width / 2);//this makes our particle's x initialize somewhere within the width of our fire object on the stage
   y = randomRange(ROOT.fire.y - ROOT.fire.height / 2, ROOT.fire.y);//this makes our particle's y initialize somewhere in the top half of our fire object on the stage
   
   ySpeed = randomRange(3, 5);//setting a random speed makes it look that much more believable, much as the random alpha value

   addEventListener(Event.ENTER_FRAME, update, false, 0, true);
So that's it if you just want to know how to make the particles dance like magic. If you want to make the ball bounce continue on, brave soldier.

We'll head back into our "Main.as" file for the duration. First up we'll add some new members to the family.
 
//FireParticle.as
  private var bounce:Boolean = false;//start it off false if you want it to be stationary from the get go, true if you want it to start off bouncing
  private var xSpeed:Number = 15;//this will be our fire's speed in the x direction
  private var ySpeed:Number = 15;//this will be our fire's speed in the y direction
Pretty basic stuff.

Now we need to put some listeners in our Main() function.
 
//Main.as
   btnBounce.addEventListener(MouseEvent.CLICK, toggleBounce, false, 0, true);//when we click on the button it will either start or stop the bounce
   addEventListener(Event.ENTER_FRAME, update, false, 0, true);
We'll do this in one go, because I'm tired. The comments should cover everything.
 
//Main.as  
  private function update(e:Event) : void
  {
   if (bounce)//if bounce is true...
   {
    //...we'll make the fire move in both x and y directions
    fire.x += xSpeed;
    fire.y += ySpeed;
    
    if (fire.x - fire.width / 2 < 0)//if it hits the left side we push it back to the right
    {
     fire.x = fire.width / 2;//repositions it so it doesn't get stuck.  Same for all the other ones
     xSpeed *= -1;//this makes the speed the opposite, ie "15" becomes "-15".  Same for all the other ones
    }
    
    if (fire.x + fire.width / 2 > SWIDTH)//if it hits the right side we push it back to the left
    {
     fire.x = SWIDTH - fire.width / 2;
     xSpeed *= -1;
    }
    
    if (fire.y - fire.height / 2 < 0)//if it hits the top we push it back to the bottom
    {
     fire.y = fire.height / 2;
     ySpeed *= -1;
    }
    
    if (fire.y + fire.height / 2 > SHEIGHT)//if it hits the bottom we push it back to the top
    {
     fire.y = SHEIGHT - fire.height / 2;
     ySpeed *= -1;
    }
   }
   else//if it's not bouncing then it sits at it's home 
   {
    fire.x = SWIDTH / 2;
    fire.y = SHEIGHT * 0.85;
   }
  }
  
  private function toggleBounce(me:MouseEvent) : void//when clicked...
  {
   if (!bounce)//..if it's not bouncing yet then we will make it bounce...
   {
    btnBounce.txtBounce.text = "STOP";//changes the dynamic text box
    bounce = true;
   }
   else//...otherwise we stop it
   {
    btnBounce.txtBounce.text = "BOUNCE";//changes the dynamic text box
    bounce = false;
   }
  }
Okay, all. I'm tired. Writing tutorials are much more time consuming than I thought. I really hope this helps you out. If it does, hit me up and let me know how you've used the concept or if you have any questions. Peace out!